Craft Your Own Book Press: A DIY Guide
You want to bind your own book, or looking to press some foliage into your notebook, but the book presses out there didn't meet your needs? Let's just build one! I'll walk you through how to build one at home with few tools and basic materials that you can even do it in your apartment.
Table of Contents
Why do you need a book press?
When it comes to bookbinding, the main purpose of a book press is to keep all your papers together and also provide enough force to handle it around without worry. Your new book will be tightly squeezed by the press to allow you to glue the spine or keep everything in place while waiting for the glue holding the book together to dry out.
You could also use a book press to straighten pictures, watercolor paintings, bookmarks, or press flowers or foliage into a notebook.
I, for one, bought a book meant as a gift, but it was just a pdf file. So I thought that printing and binding it would be a fun little project, as well as a more thoughtful gift, but I had nothing to press it with.
Why not buy one?
I found myself searching and searching for a book press large enough to fit a book printed on normal printer paper. All the book presses out there were either too small for my project - usually the area fits A5 sized books, or way too expensive. So I decided to DIY it.
There is also a great amount of satisfaction when you DIY something instead of just adding it to a shopping cart.
I do recommend that if you’re just starting with a new hobby, just try to DIY expensive stuff. Later on, when you want to pursue the hobby further, you can always invest in quality tools.
Materials
When it comes to materials, after doing some research on Amazon for the available options, I found that most cheap book presses were made out of bamboo wood. I decided to use the IKEA bamboo cutting boards as the base since they were large enough in size to fit a letter paper, as well as the cheapest option available.
 Let’s look at all the press components before listing the materials required.
The materials in the picture don’t match the quantities required, so please check the list below for actual requirements.
Tools required:
- a drill - either handheld, proper drill or a dremel
- a vacuum - to cleanup the aftermath
Materials used:
- 2 cutting boards - 17 3/4 in x 11 in ikea board used
- 4 long screws - 1/4 inch x 2 inch
- 1 wood drill bit - 5/16 inch
- 4 butterfly wing nuts - 1/4 inch
- 12 washers - 1/4 inch (4 optional if you don’t use the nuts below)
- 4 nuts - 1/4 inch (optional)
- 4 furniture legs - taller than the screw cap (or multiple felt pads to stack until taller than screw cap which you glue together)
Note: Please make sure the wood drill bit is 1 size larger then your screw’s size. I bought the same size and made it harder to align the holes for all screws to fit in. I am lucky enough to own a dremel and used the sanding bit to expand the holes, but there are still areas where it rubs on the boards.
 Be careful when picking up the screws so that they are twice as long as the size of the boards used, plus the depth of the spine of your book. The longer the better as it might fit other future projects.
Perfectionist extras:
- sandpaper or sanding bits to smoothen the wood (only for cutting boards or wood)
- white glue or candle wax for laminate pressed wood alternative below
Alternatives
Although it worked great for me and it was the cheapest option, upon further consideration, I don’t think the bamboo cutting boards will withstand many projects.
The biggest problem with the bamboo wood is that it soaks the moisture, warping themselves in time. If you do decide to use this type of material, I have some tips at the end on how to try and straighten them up.
If I were to redo the press, I would try to use a shelf board made out of laminate pressed wood and cut it to the desired length. Although this does require a bit more work and it’s messier if you DIY in an apartment.
When using the laminate wood, I strongly suggest sealing the interior of the holes so the pressed wood won’t chip away when pulling the screws. You could either use some candle wax or wood glue (or kids white glue).
More advanced options would be either plastic boards (must be thick and unyielding to withstand pressure), or metal sheets. If you are a beginner, I would steer away from both of these materials as cutting through them is quite hard and not really apartment friendly.
Building steps
Drilling the holes
First step is to draw on one of the boards the location where the holes would be placed. I measured the center of holes to be about 4cm (1.5 inch) from the edge, thinking it would be far enough from the edge so the pressure won’t break it when fully tighthened. This is an overprecation, if you have smaller boards and need more space, I suggest there is at least 2 cm (0.75 inch) from the edge, or any other measurement that ensures the washers are in full contact with the panel surface.
If you’re using the same boards I did, it will be a bit tricky to measure as the edges are slanted, but I trust you can make it work.
After drawing all the 4 holes locations on one board, it’s time to drill.
Ensure you have placed the board on the edge of a table or countertop, and the hole location is not on the the table so you don’t drill your table as well.
Hold the board still and start drilling. If it moves a bit there should be no problem. You can always try to adjust the matching hole on the second board.
I suggest you drill all the holes on one board before moving to the second one.
Draw the holes location on the second board by passing a pen refill through the holes of the first one and drawing around the edges.
To help you figure out if you aligned the holes properly, on the second board, drill the first 2 holes on opposite corners. Then you can try to fit the screws through both boards and see if it all fits properly. If they don’t grab some sandpaper and expand it a bit.
This would be the perfect time to also mark the boards, such as which is the “top board” and what face of each board goes up. I wrote on the side of the boards and it could easily be identified which is on top and the direction of the faces. This allows for easy assembly later on, as flipping the boards around the holes might not align and the screws might not fit anymore.
With the 2 holes drilled in, you can now use the screws to hold the boards together with the wing nut. And just drill the remaining 2 holes through the first board holes. This will ensure the last 2 will be perfectly aligned and it won’t slip.
Once you’ve drilled all the 8 holes, it’s time to sand them. So grab your sandpaper, cut a small piece and rub the wall of the hole and the top of the board to smoothen out all the edges.
Check if all the screws fit in properly through both of the boards. You can file with sandpaper where it rubs or it just doesn’t fit. Hopefully, by using the technique above, the holes shouldn’t be too misaligned to require much sanding.
Cleanup and seal
Now clean all the wood dust. Clean the boards with a slightly damp cloth to get rid of all the dust on them.
If using the pressed wood shelves alternative, this would be the time to seal it. Ensure the wood has dried after cleaning it up. Just soak a cotton swab in glue and smear over the walls of the drilled holes. Let it dry and repeat a few times to ensure all the wood is sealed. Do check after the second coat that the screws would still fit if applying more.
To seal the wood, you could even use some candle wax. With a small piece of dry candle rub the holes until smooth. There is no need to melt the wax. The friction is enough for it to coat the wood.
If you cut it from a larger pressed shelf piece, please try to seal the edge as well so you don’t get any splinters under the skin.
Assembly
Now that all the holes are in place and you’ve cleaned up your work area. Time to finish the press.
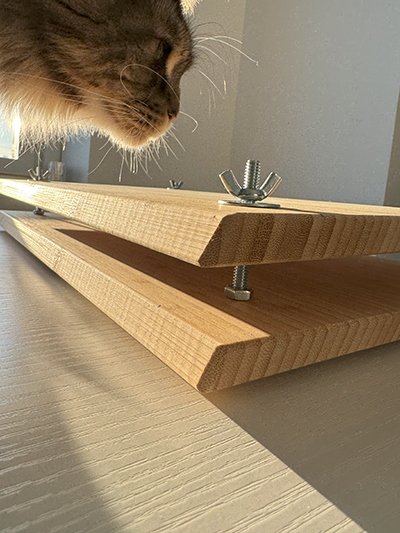
Anywhere the screw cap, or a nut is to be placed, you must place a washer between the wood and it. This will ensure that upon tightening it up it won’t chip away at the wood and it will disperse the pressure on a larger surface.
I suggest you place a nut over the “bottom” board so it’s secure and the screw won’t fall everytime you unscrew the wing nut. Even if your book spine depth is smaller than the nut, I recommend using some cardboard as padding between the boards and the book anyway.
Next up place the top board, add another set of washers and your wing nuts.
If you found some legs for the board, now it’s the time to glue them to the bottom to ensure the screw won’t scratch at your desk.
You have successfully finished making your very own book press!
Random tips
If using the bamboo cutting boards, they are usually preoiled to ensure the wood doesn’t warp upon water contact. I have successfully used baking paper as padding between the board and the padding cardboard. If you have plastic sheets, those would do even better as they are not prone to folding and easier to work with.
If using wood, you could also apply varnish / paint to seal it from all moisture. I didn’t do it since I am quite skeptical that the bamboo board won’t start warping while drying the paint and I have no other press to keep it straight.
I really recommend using the bottom nut. I did not in the beginning and the screws kept on falling when using it.
The screw on the bottom might scratch your desk if you don’t add legs to the board.
On straightening the bamboo boards
My kitchen is equipped with bamboo cutting boards. I have discovered that upon contact with water they can easily warp, with the edges of the board lifting up.
The easiest way I found to straighten them back is after washing them, pat them dry. Then just place them face flat on the countertop and rotate them several times on the other face until dry.
Full disclaimer, they won’t be extremely straight, but it should do the job.